Platform Setup
Welcome to the Platform Setup section.
In the Platform Setup manual, you'll find detailed explanations on how to manage menu Catalog in Vendo Backoffice.
Shared Secret
Your Shared Secret can be found under "Catalog -> Merchants -> Settings" of Vendo Backoffice.
The Shared Secret is a password that you must use when using Vendo’s APIs. It's available to you once we receive your signed contract.
If you use NATS then you’ll use it to configure the biller settings.
If you use Gateway API or eCommerce platform solution then you would receive your Gateway API Secret after the successful testing phase.
Importance of postback
Postbacks, also known as callbacks or webhooks, are essential for confirming successful transactions, enabling accurate record-keeping and prompt customer notifications.
Vendo's platform uses postbacks to send information directly to your system. To utilize this feature, simply configure your postback endpoint in Vendo's back office for each of your sites. Go to Catalog > Sites> URLs > Postback URL > Change postback endpoint URL
If you encounter a postback issue with any of your end-users, you can resend the postback (Adduser callback or Transaction callback) to ensure the action is correctly captured. See instructions below.
Important note: Please be aware that once a transaction is completed and the user is charged, failure to process the postback or provide a valid response from your platform can lead to access problems, which could negatively affect the user experience.
To address this, follow these steps:
- Log in to the Vendo Backoffice.
- Locate the subscription (for Adduser callback) or the transaction (for Transaction callback) with the issue.
- In the top right corner of the panel, you'll see a 'Resend' button.
- Click the arrow next to the button.
- Resend the desired postback.
Managing Postback Error
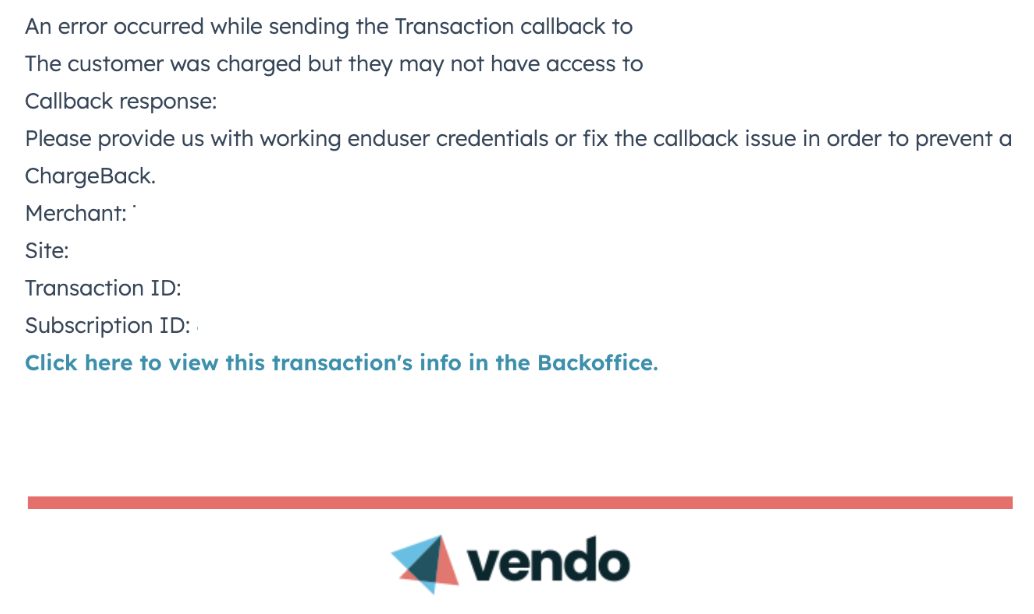
Postback error emails are sent to merchants to notify them of issues with callback attempts for specific transactions. These emails provide transaction details and highlight errors, such as:
"An error occurred while sending the callback to this site. The customer was charged but may not have access. Callback response: [specific error details]."

Merchants are urged to address these errors by fixing callback issues or providing working end-user credentials to prevent customer dissatisfaction, refund requests, or chargebacks.
Postback errors are logged in the Action History within both the Subscription View and Transaction View. Failed postbacks are marked in red, with detailed error messages explaining the issue.
It is crucial to resolve these errors promptly, as unresolved callback issues can prevent customers from accessing services they’ve paid for, potentially leading to refunds or chargebacks.
IP Whitelisting Guidance for Host Server Changes
If a merchant changes host servers but the postback URL remains unchanged, there is no need to whitelist new IP addresses. However, please note that Vendo only sends postbacks from a specific list of IP addresses. More information on this topic, including the updated list of IP addresses, can be found here.
Creating an Offer in Vendo Backoffice
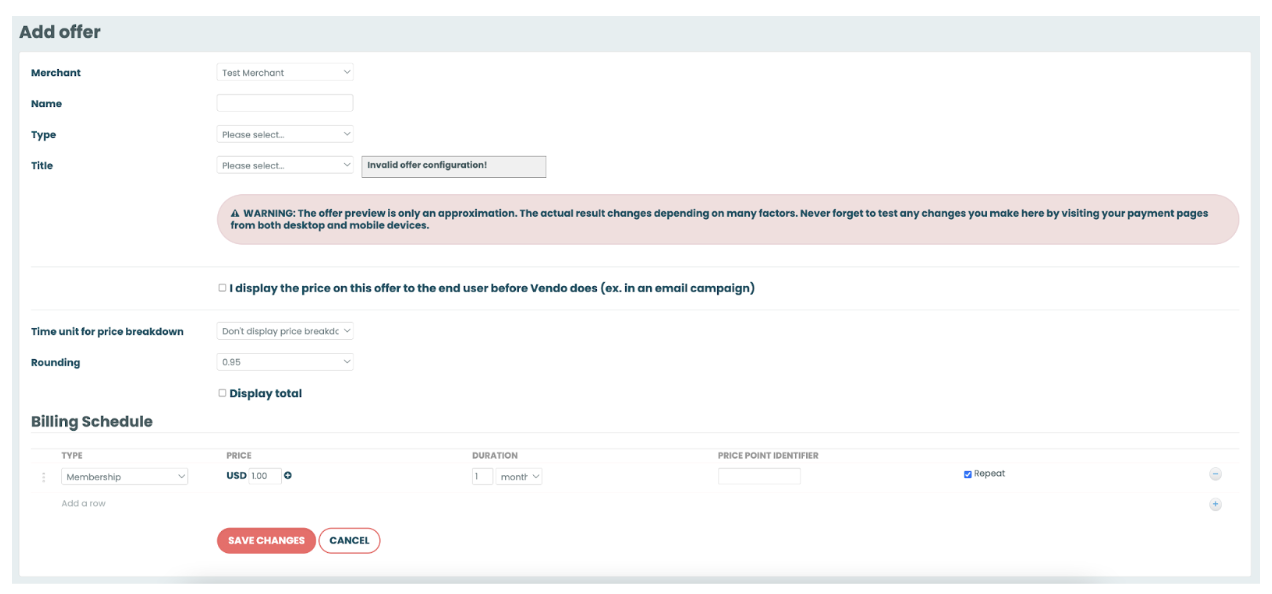
In Vendo's Backoffice, an offer, also known as a product, allows customers to purchase services or memberships on your site. You can create multiple offers and assign them to different sites as needed. To create a new offer, navigate to Catalog > Offers and click on + Add new offer.

You'll need to complete several configuration fields:
- Merchant: Select your merchant name.
- Name: Enter an internal name for the offer.
- Type: Choose the offer type:
- Normal: For initial signups, including recurring, non-recurring, and lifetime subscriptions.
- Cross Sale: For internal cross sales or partnerships as secondary products.
- One-click Sign-up: Allows existing members to purchase additional services.
- Target Site: Available only for Cross Sale and One-click Sign-up offers.
- Title: Select a title from the dropdown; this will be displayed to customers.
- Offer Preview: Next to the title, there is a grayed-out box displaying the offer details. This provides a visual representation of how the offer will appear on the product page.
- Warning About Offer Preview: The offer preview is an approximation, and the actual display may vary. Always test changes on any payment pages from both desktop and mobile devices.
- Display Price Checkbox: This checkbox allows you to disable Vendo's Dynamic Pricing feature. Select it if you display the price to the end-user before Vendo does.
- Time Unit for Price Breakdown: Choose how the price is presented (e.g., per day, per month).
- Rounding: Select the rounding type for the offer price. This applies to all currencies.
- Display Total: Check this box if the price is not included in the offer's title.
- Billing Schedule: Customize the billing details:
- Type: Select Trial, Membership, Token, or Lifetime.
- Price: Enter the baseline price in USD; additional currencies can be added.
- Duration/Quantity: Specify the period or token amount.
- Repeat: Check for recurring offers; leave unchecked for one-time billing.
After configuring these fields, click Save Changes. The new offer will appear in the list of available products, ready to be assigned to your sites.
For detailed guidance, refer to Vendo's documentation.
Deactivating an offer
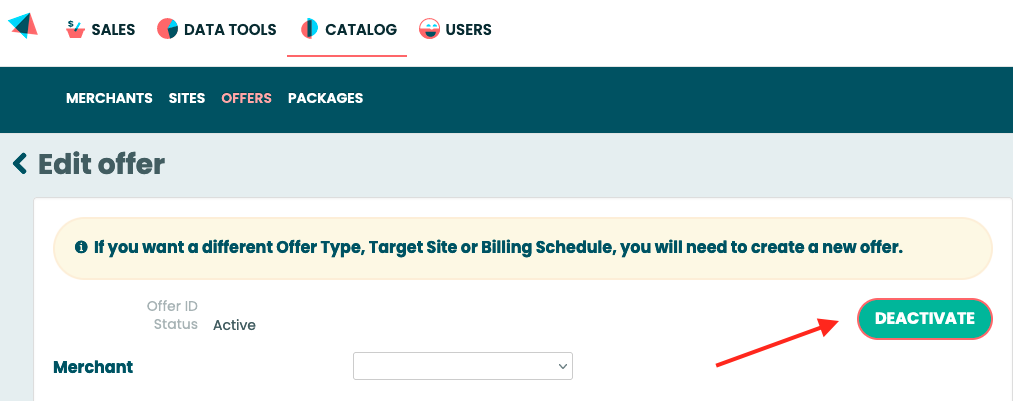
If you are no longer using an offer, you can deactivate it in the Back Office. This is particularly important if the repurchase option is enabled for your account, as it will prevent customers from purchasing a new subscription at the old pricing.
- Navigate to Catalog > Offers and select the offer.
- On the right-hand there is a button "Deactivate".

- click the "Deactivate" button.
- the message will show "The offer has been successfully deactivated"
- To undo this action, click the "Activate" button.
Setting Local Currency for Offers
When adding a currency to a new offer, there is a wide variety of currencies to choose from, though the baseline will always be set in USD. On the product page, the currency displayed will be the one used in the country where the customer is located, providing a more user-friendly experience. However, it’s important to remember that currency exchange rates will be applied during the payout process. To add a preferred currency, navigate to Catalog > Offers, scroll down to the Billing Schedule, and click the arrow in the "Price" section next to the price in USD. Adjust the necessary details, then click "Save changes."

Unique Identifiers and Multi-Site Use of Offers
An offer is a pricing plan that combines the price and duration customers pay for a product. Each offer has a unique identifier and can be used across multiple sites for added flexibility.
Username and Password Requirements for New Users
By default, usernames and passwords must consist of 6-12 alphanumeric characters. If a chosen username is already in use, Vendo will automatically generate a random username in the format "user12345."
Usernames can also be configured to be an email address.
Cascading Between Billers and Retry Limits
Cascading between billers enables merchants to set a maximum number of retry attempts before a transaction is redirected to the next biller in line. This limit can be adjusted between 1 and 6 retries. The retry process by the biller is designed to increase the likelihood of a successful payment, particularly in cases where the initial attempt fails due to temporary issues like network errors. This approach also helps minimize delays in payment processing, ensuring a smoother and more efficient transaction experience.
Key URL Types
There are various types of URLs, each serving a different purpose within the Vendo system:
- Public URL: The actual website URL.
- Member URL: The URL of the members' area.
- Success URL: The URL to which a customer is redirected after a successful payment.
- Support URL: The URL containing customer support details.
- Postback URL: The URL where Vendo sends postbacks.
- Decline URL: The URL to which users are redirected if a payment fails.
Both the Success URL and Decline URL are considered redirection parameters
It’s important to note that the Decline URL is passed in the request only and cannot be pre-configured by default. If no decline URL is passed in the join link, the Success URL will be used for both successful and declined payments. If no Success URL is configured or passed, the Member URL will serve both purposes.
Optimizing Customer Retention with Vendo Price Models
Vendo's Back Office platform offers merchants a transparent and flexible tool for managing discount offers, accessible in the Catalog > Sites > Price Models section. These price models are tailored to enhance customer retention and optimize conversions by targeting key stages of the customer lifecycle.
With a default setup in place, merchants have full visibility of the configured discounts and can request adjustments to align with their specific business goals. Discounts are configured on a per-site basis, allowing for precise targeting and optimization.
Each discount offer can be assigned a weight, which determines the probability of it being shown to a customer. Offers with a higher weight will appear more often, while those with a lower weight are shown less frequently. If all discounts within the same discount type have the same weight, they will be displayed with equal probability.
This weighting mechanism allows merchants to strategically balance and test the effectiveness of their offers, ensuring optimal performance.
This transparency ensures merchants can track the effectiveness of their offers and make data-driven decisions to maximize customer satisfaction and revenue growth. For assistance with customization or further insights, merchants can reach out to the Merchant Success Team.
Cross-Sale Overview
Cross-sale is a sales strategy designed to enhance customer experience and increase merchant revenue by offering complementary, additional products or subscriptions.
Additionally, cross-sale can refer to a partnership arrangement where one party (the seller) allows another party (the buyer) to display their offerings on the seller’s platform, typically in high-visibility locations such as the payment page.
- Seller’s Perspective: The seller monetizes this placement, improves their site’s offerings, and provides visibility to the buyer’s product or service.
- Buyer’s Perspective: The buyer gains access to the seller’s audience by purchasing a prominent spot, such as the checkout page, to promote their own services.
For example, if Site X (the seller) hosts a payment page, Site Z (the buyer) might purchase a placement there to advertise their services, leveraging Site X's traffic and visibility.
Partnering with Vendo
To ensure a seamless cross-sale integration, both parties can rely on Vendo’s expertise. Our team supports sellers and buyers in finding the right match to maximize mutual value.
Adding Cross-Sale in Vendo Backoffice
Adding a cross-sale in the Vendo Backoffice is straightforward. You can follow the detailed instructions in our documentation:
Steps for Sellers:
- Obtain an offer ID and a ref code from the buyer.
- Log into the Vendo Backoffice:
- Navigate to Catalog > Sites > Products.
- Go to the Cross-Sales section.
- Add a new cross-sale offer:
- Click the plus (+) sign.
- Enter the Cross-Sale ID provided by the buyer.

- The cross-sale will appear as a draft on the product page:
- Add the ref code.
- Click Save Changes.

Steps for Buyers:
- Create a cross-sale offer in the Vendo Backoffice:
- Navigate to Catalog > Offer.
- Set the type to "Cross-Sale."
- Assign the target site.
- Provide the seller with the ref code generated by the platform.
Review and Approval Process
Before a cross-sale goes live, it is reviewed by Vendo’s Risk and Payments team. Once approved, the status will change, and the draft status will disappear.
Implementing One-Click Offers with Vendo
One-click offers enable existing customers to purchase additional products on your site without re-entering their payment details, streamlining the purchasing process and enhancing user experience.
Steps to Implement One-Click Offers:
- Configure One-Click Offers in Vendo's Back Office:
- Log in to your Vendo Back Office.
- Navigate to the Offers section under Catalog.
- Create a new offer, ensuring the offer type is set to One-Click.
- Set the pricing, duration, and other relevant parameters for the offer.
- Save the offer configuration.
- Generate the One-Click Join Link:
The base URL for the one-click link is:
https://secure.vend-o.com/v/oneclick?
- Adjust the following mandatory parameters to the URL:
subscription: The Vendo Subscription ID of the user.offer: The Offer ID of the one-click offer.signature: The URL signature for security.
- Optional parameters include:
offers: A comma-separated list of offer IDs to display in the one-click session.ref: A pass-through value that will be posted back to you in Vendo’s postback as themerchant_referenceparameter.
Example:
https://secure.vend-o.com/v/oneclick?subscription=345&offer=12&offers=12,23,24&signature=OIPslx5X
- For detailed information on parameters and URL signing, refer to Vendo's documentation on One-Click Join Link.
- Utilize Vendo's SDK for PHP (Optional):
- If your project is in PHP, you can use Vendo's SDK to simplify the integration process.
- Installation instructions and examples are available in the Vendo SDK for PHP repository.
- Implement Time-Limited URLs (Optional):
- To limit the validity period of a one-click link, use the
expiresparameter with a Unix timestamp indicating when the URL should expire. - This ensures the link is only usable within a specified timeframe.
- For guidance on creating time-limited URLs, see Vendo's Create a Time-Limited URL documentation.
- Testing and Deployment:
- After configuring and generating the one-click links, test the functionality in a test environment to ensure seamless user experience.
- Once testing is successful, deploy the one-click offers to your live site.
By following these steps, you can effectively implement one-click offers, providing a streamlined purchasing experience for your customers and potentially increasing your site's revenue.
Updated 3 months ago
